Mochi Ice Cream Recipe Without Microwave
We walk you through a stovetop method that gives a chewy shell around a cold, creamy center without relying on a microwave. Our approach keeps tools cold, portions pre-scooped on parchment, and a steady workflow so each piece stays tidy.
We emphasize glutinous rice flour, also called sweet rice flour, because regular rice flour won’t create the stretchy dough we need. Dusting with cornstarch or potato starch prevents sticking while keeping flavor clean.
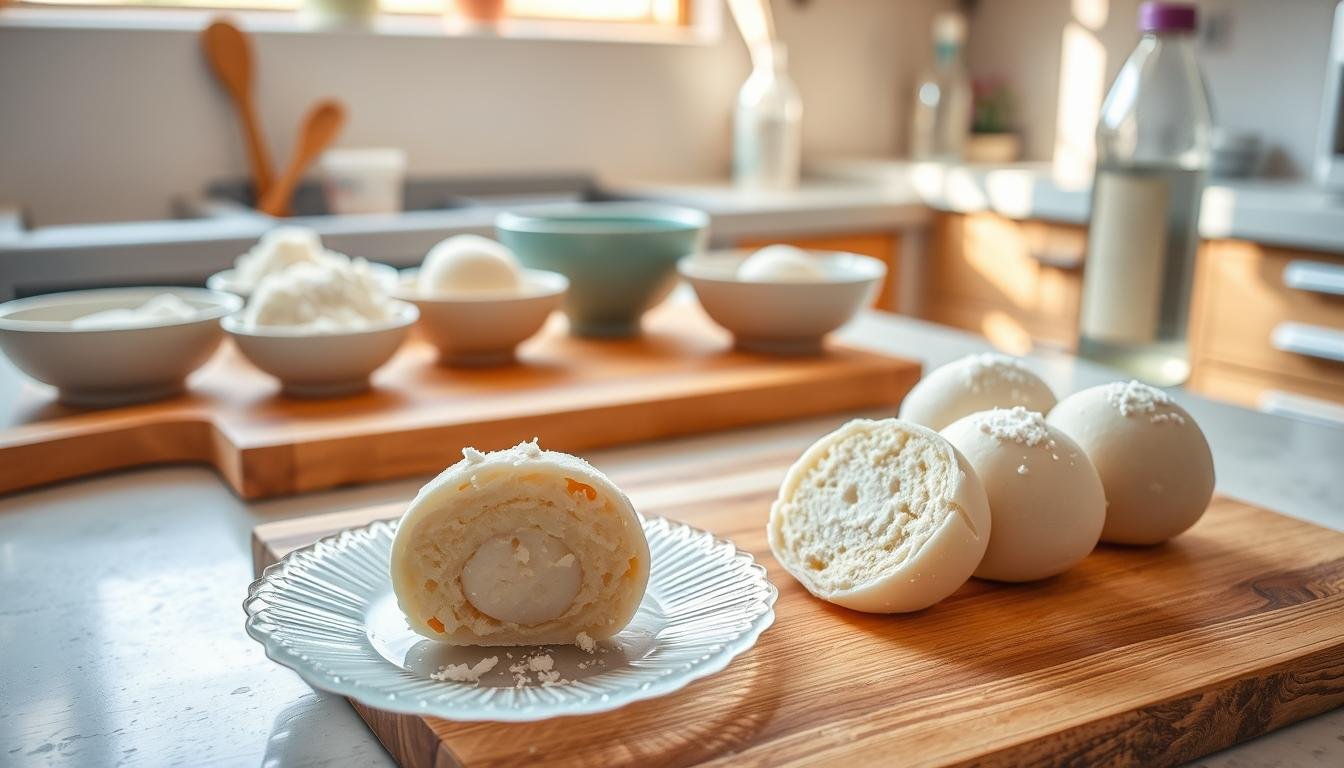
Step-by-step, we cook the dough until translucent, roll it to about a quarter inch, cut 3¾-inch rounds, and wrap each seam-side down in plastic wrap. Then we freeze the pieces at least two hours and store them in an airtight container for up to one week.
Working one ball at a time and keeping a chilled scoop helps prevent melting. We also suggest a bowl, parchment-lined trays, and a stack of paper towels nearby for a smooth, professional dessert project you can customize with vanilla, chocolate, or fruit choices.
Why we’re making mochi ice cream on the stovetop today
Using a pan lets us control heat and texture as the dough transforms into a stretchy, translucent mass. We cook glutinous rice flour, water, and a touch of oil over low-medium heat in a nonstick pan or wok. It takes roughly 10–15 minutes of steady stirring to reach the ideal glossy stage.
This stovetop path avoids the variability of microwave wattage and gives tactile feedback so we stop at the perfect chew. A little sugar can be added for balance, but the gentle sweetness should not overpower the ice cream center.
Our workflow stays compact and professional. We set out starch for dusting, parchment-lined trays, and plastic wrap for shaping. Working one ball at a time and keeping tools chilled helps prevent melting and keeps the process repeatable.
- Hands-on control: stop when dough is elastic and smooth.
- Predictable timing: adjust minutes and stirring to avoid scorching.
- Reliable contrast: cold ice inside, stretchy outer layer outside.
Key ingredients and tools for mochi made with glutinous rice flour
Proper ingredients and a few simple tools let us turn sticky rice flour into an even, workable dough. We keep measurements consistent and tools chilled so each portion seals cleanly.
Glutinous versus regular rice flour
Use glutinous rice flour, often sold as Mochiko Sweet Rice Flour, for the stretchy, chewy texture we want. The term glutinous means sticky, not gluten. Regular rice flour gives a crumbly, non-elastic result and will tear when wrapped.
Cornstarch, plastic wrap, and parchment
Dust surfaces with cornstarch or potato starch to stop sticking and to let excess brush off. We roll the dough into a neat rectangle on parchment, cut portions, then use plastic wrap to shape and freeze each piece seam-side down.
Ice cream, scoop size, and keeping tools cold
Pre-scoop ice cream into ~2 tablespoon mounds and freeze them firm. Chill the scoop, tray, and cutters to slow melting. Work one ball at a time and keep a bowl of ice water nearby to rinse tools if needed.

| Item | Why it matters | How we use it |
|---|---|---|
| Glutinous (sweet) rice flour | Creates elastic, chewy dough | Cook with water on stovetop until translucent |
| Cornstarch / potato starch | Prevents sticking, easy cleanup | Dust work surface and cutters lightly |
| Plastic wrap & parchment | Shapes and protects portions in freezer | Wrap seam-side down; use parchment to roll rectangle |
| Ice cream scoop & chilled tray | Consistent portions, less melt | Pre-scoop 2 tbsp each; keep tools cold between uses |
Mochi Ice Cream Recipe Without Microwave
Start by freezing small, uniform scoops so assembly stays quick and tidy. We pre-scoop about 12 two-tablespoon portions of ice cream onto a parchment-lined tray and freeze them until firm. This gives each ice cream ball shape and slows melting while we work.
Prep the ice cream balls and freeze until firm
Chill an ice cream scoop and tray in the freezer first. Scoop roughly two tablespoons per portion, place on parchment, and freeze for hours until solid. Bring one ice cream ball out at a time when wrapping to keep the rest cold.
Cook the mochi dough on the stovetop until translucent
Combine glutinous rice flour, water, and a touch of oil in a nonstick pan. Stir constantly over low-medium heat for about 10–15 minutes. When the mixture turns thick, glossy, and translucent, it’s ready to transfer.
Dust, flatten, and chill the dough for easier handling
Dust parchment with cornstarch, scrape the hot mochi dough onto it, and dust the top. Roll to an even rectangle about 1/4 inch thick. Chill briefly so the slab firms for cutting into circles and wrapping with plastic wrap.
Step-by-step: cooking mochi dough on the stovetop
First, measure sweet rice flour and place it in a large nonstick pan. Add water and 2 teaspoons of neutral vegetable oil, stirring to combine before you turn on the heat.
Combine ingredients in a nonstick pan
We scoop glutinous rice flour into the pan, pour in measured water, and add oil. Stir briefly off heat so the mix is lump-free, then set the stove to low-medium.
Stir constantly until thick and glossy
Keep the mixture moving. Over about 10–15 minutes the mixture will thicken and turn translucent. If the pan feels too hot, lower the flame to protect texture.
Transfer to a cornstarch-dusted surface and cool
Dust a tray with cornstarch, scrape the hot dough onto it, and dust the top. Pat or roll to roughly 1/4 inch, cover lightly, and let cool to room temperature before chilling briefly.
| Step | Time | Pro tip |
|---|---|---|
| Mix | 2 minutes | Combine off heat to avoid lumps |
| Cook | 10–15 minutes | Stir constantly; lower heat if scorching |
| Cool | 10–20 minutes | Dust with cornstarch to prevent sticking |
| Chill briefly | 15–30 minutes | Makes cutting circles easier |
Shaping the mochi: roll, cut circles, and work quickly
We shape the chilled dough into a smooth sheet, then cut perfect rounds so each portion wraps evenly.
Roll the slab to about a quarter inch thick. That thickness stretches over the filling without tearing. Keep the work surface well dusted with cornstarch to stop sticking and to keep edges clean.
- Roll an even rectangle before cutting so circles are uniform and you waste less dough.
- Use a 3¾-inch cutter — a biscuit cutter, tin can ring, or inverted glass — for consistent circles.
- Brush off excess starch from each round before filling to avoid a gritty exterior.
Quick handling tips
Monitor dough elasticity. If it resists, give it a brief rest. If sticky, dust lightly again; do not overload with flour or starch.
Work briskly and only remove one ice cream ball from the freezer at a time to limit melt. Keep a small cup of starch nearby to refresh the surface as needed.
| Cutter type | Diameter | Pros | Cons |
|---|---|---|---|
| Biscuit cutter | 3.75 in | Clean edge, uniform circles | Needs cornstarch to release |
| Tin can ring | 3.75 in (trimmed) | Sturdy, easy to press | May need smoothing of rim |
| Inverted glass | 3.5–4 in | Common household option | Edges can be less precise |
Filling and sealing: scoop, pinch, and wrap
We assemble each piece by centering a frozen scoop on a dusted round and shaping the dough quickly by hand. This keeps the filling cold and the shell flexible.
Place the ice cream ball and seal the edges
Set one firm ice cream ball in the middle of a cornstarch-dusted disc. Bring the edges up gently so the dough stretches without tearing.
Pinch the seam with steady pressure to make a tight seal. Smooth any pleats with your fingertips and a touch of starch if needed.
Wrap seam-side down and return to the freezer
Turn the sealed piece seam-side down and wrap it neatly in plastic wrap. This helps the shape set evenly while protecting the surface from frost.
Place each wrapped piece on a parchment-lined tray and freeze at least two hours. Work one scoop at a time and keep your ice cream scoop and tray chilled to limit melt.
- Use a consistent dough thickness so the bottom is not bulky.
- Lightly dust your hands with flour or starch to prevent sticking.
- Smooth the dome and confirm the seal before wrapping.

| Action | Why it matters | Tip |
|---|---|---|
| Center frozen ball | Prevents melting and uneven filling | Work quickly; one ball at a time |
| Pinch seam | Stops leaks and frost buildup | Use gentle, firm pressure |
| Wrap seam-side down | Maintains dome shape while setting | Return to freezer on parchment |
Freeze, serve, and enjoy at the right time
A final freeze and a few minutes at room temperature tune the balance between chew and cold. We freeze each wrapped portion so the filling rehards and the dough firms into a neat shell.
Timing and simple steps before serving
We freeze our wrapped pieces for at least two hours. For best texture, let a single ball sit on the counter for a few minutes before serving.
- Freeze minimum: 2 hours so the filling and shell set.
- Rest briefly: a few minutes loosens the exterior for easy biting.
- Serve seam-side down to keep each piece tidy on a plate.
- Store in an airtight container to avoid freezer flavors and frost.
- Label the container with date and flavor to manage hours and rotation.
Storage and handling tips
Place pieces in a single layer first. Add parchment between layers before stacking to stop balls from sticking.
| Action | Time | Why it matters |
|---|---|---|
| Freeze wrapped | 2+ hours | Ensures dough and filling set evenly |
| Rest at room temp | 2–5 minutes | Softens exterior for chew without melting |
| Store airtight | Weeks (best 1) | Prevents ice crystals and preserves flavor |
We avoid using a microwave here. A short counter rest gives ideal texture without risking melt-and-refreeze damage. Bring out only what you plan to eat; repeated thawing changes both ice and dough mouthfeel.
Flavor ideas and variations we love
We like to match filling choices to the mood—classic, bold, or bright—so every bite feels balanced.
We go classic with vanilla, lean into rich chocolate, or add grassy matcha for a refined edge. For chocolate lovers, consider folding a thin cocoa layer into the dough for more depth.

Mango-and-cream balls freeze firm and make assembly neat. We pre-freeze these fruity centers so they hold shape and slice cleanly.
Dairy-free options such as coconut-based ice cream or fruit sorbets work well. Note that sorbet tends to soften faster; serve those pieces sooner after the brief counter rest.
- Balance sugar in the dough so sweet fillings do not overwhelm.
- Try swirls—vanilla-strawberry or chocolate-coffee—for visual and flavor contrast.
- Dusting with cornstarch is standard; milled freeze-dried fruit adds color without moisture.
| Flavor Type | Best Fillings | Texture Notes |
|---|---|---|
| Classic | Vanilla, milk-based ice cream | Reliable freeze, familiar crowd-pleaser |
| Bold | Chocolate ganache, matcha gelato | Denser, may need slightly warmer rest time |
| Fruity | Mango cream, berry sorbet | Bright flavor; sorbet softens faster |
| Dairy-free | Coconut-based, fruit sorbets | Varying firmness; monitor thaw time |
We document winning combinations so we can reliably make homemade mochi ice again. Small tests help us refine sugar, dough thickness, and serving timing for each choice.
Common pitfalls and how we fix them
Common issues—stickiness, tearing, and melting—have simple fixes we use every time. A short checklist and a steady pace save time and keep each piece tidy.
Too sticky dough: cornstarch management and cooling tips
We solve sticky dough by dusting the surface and our hands liberally with cornstarch or potato starch. Work in stages: let the dough cool to room temperature, then chill briefly before rolling.
Minor stickiness is normal. A few extra minutes of cooling plus a light dusting clears most handling problems.
Dough cracking or tearing: thickness and speed adjustments
Roll the slab to about 1/4 inch so it stretches over the frozen filling. If the sheet tears, re-roll scraps once and use starch to stop sticking.
If the dough is too cold and cracks, let it warm for a couple minutes before shaping. Move quickly but calmly; speed prevents ragged edges.
Melting ice cream: chill tools and work one ball at a time
We bring out a single frozen ball at a time and keep scoop, cutters, and tray chilled. Seal edges promptly and wrap seam-side down in plastic wrap to set the dome.
For storage, layer pieces with paper in an airtight container. Dark chocolate fillings may soften faster; serve those sooner after a short counter rest.
| Problem | Cause | Quick fix |
|---|---|---|
| Sticky dough | Warm surface or low starch | Dust cornstarch, cool then chill 10–15 minutes |
| Cracking | Too thin or too cold | Keep 1/4 inch thickness; warm briefly before shaping |
| Melting filling | Tools or filling too warm | Chill scoop/tray, work one ball at a time, wrap in plastic |
Make-ahead, storage, and serving for the best texture
Prep, freeze, and store strategically to keep shells elastic and centers firm. We pre-scoop ice cream balls into a chilled tray, freeze them solid, and then assemble in batches to save time.
Store finished pieces in an airtight container for up to one week. Place paper between layers to prevent sticking and keep each piece wrapped in plastic wrap seam-side down to hold shape.
Bring single pieces out a few minutes before serving so the exterior softens while the center stays cold. Label containers with flavor and date so we rotate stock and serve variety with confidence.
Keep a small jar of cornstarch for quick dusting, a bowl and an ice cream scoop ready for portioning, and a cutter, parchment, and extra wrap in the prep kit. In warm weather, serve on chilled plates to slow melt and extend the perfect texture window.